Introduction
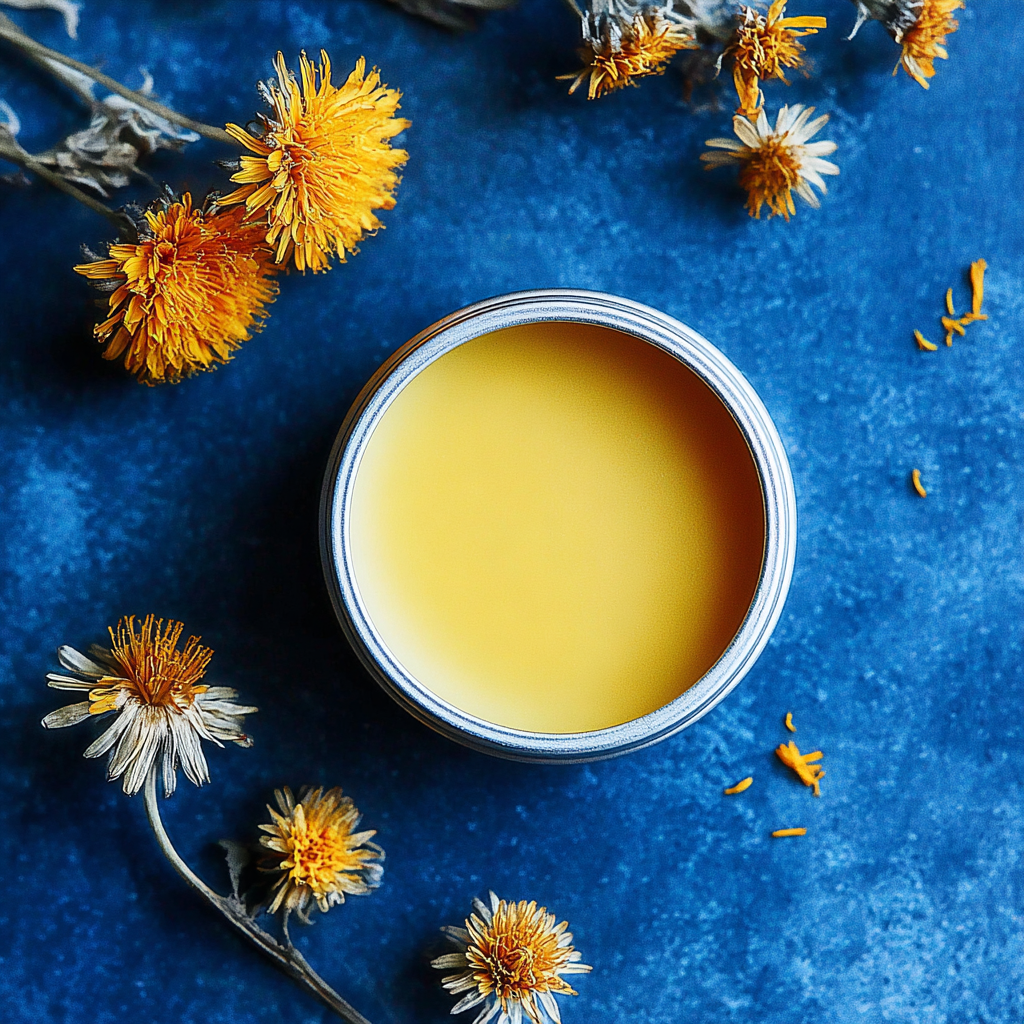
As the vibrant dandelions bloom in your yard, they bring forth more than just a cheerful yellow hue; these resilient plants offer an array of benefits, particularly in herbal remedies. Dandelion salve is a wonderful, natural solution for soothing skin irritations, moisturizing dry patches, and even aiding in minor cuts and bruises.
This salve harnesses the potent properties of dandelions, combined with nourishing oils and beeswax to create a therapeutic balm. Whether you’re an avid herbalist or trying your hand at natural skincare for the first time, making dandelion salve is an accessible project that yields rewarding results. Let's dive into this delightful recipe.
Ingredients
- 2 cups dandelion flowers
The flowers are packed with anti-inflammatory and antioxidant properties. Used in the salve, they help to soothe and heal the skin, making them ideal for addressing minor irritations and providing moisture. - 1 cup olive oil
Olive oil serves as the base for this salve, rich in vitamins and antioxidants. It provides deep hydration and helps to ensure the skin remains soft and supple, enhancing the salve’s nourishing qualities. - 1/4 cup beeswax
Beeswax acts as an emulsifier and thickener in the salve, providing a protective barrier on the skin that locks in moisture. Its natural properties also allow the salve to solidify into a balm. - Optional: 10-15 drops essential oil (like lavender)
Adding essential oils not only enhances the fragrance of the salve but also offers additional therapeutic benefits. Lavender, for instance, has calming properties and can further soothe irritated skin.
Directions & Preparation
Step 1: Gather and Prepare Dandelion Flowers
Start by harvesting dandelion flowers, ensuring they are free from pesticides and chemicals. Gently rinse them under cold water to remove any dirt and insects. This step is crucial as it preserves the integrity of the flowers, ensuring you harness their full healing potential in subsequent steps.
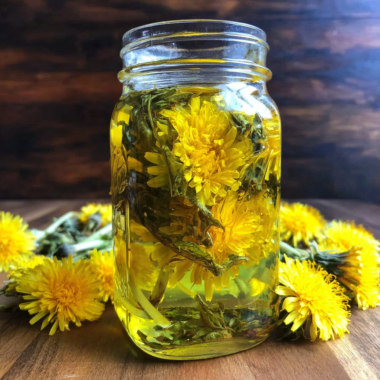
Step 2: Infuse the Olive Oil with Dandelions
Place the prepared dandelion flowers in a clean jar and cover them with olive oil. Seal the jar tightly and place it in a warm, sunny spot for at least a week. This infusing process extracts the beneficial compounds from the dandelions into the oil, resulting in a potent base for your salve.
Step 3: Strain the Oil
After the infusion period, strain the oil through a fine mesh strainer or cheesecloth into a clean bowl. This step is important to remove the solid flower material, leaving you with a clear, infused oil that is the foundation of your salve.
Step 4: Melt Beeswax
In a double boiler, gently melt the beeswax until fully liquefied. Beeswax melts at a relatively low temperature, so watch it closely to prevent burning. This melting process integrates the beeswax into your salve, creating the desired consistency while also providing a protective quality.
Step 5: Combine Ingredients
Pour the strained dandelion-infused oil into the melted beeswax, stirring continuously. This is a critical moment where both elements merge, creating a harmonious balm with the healing properties of dandelions and the protective qualities of beeswax.
Step 6: Add Essential Oils (Optional)
If you choose to include essential oils, now is the time. Adding them just before pouring the salve into containers ensures the delicate compounds remain effective. Stir well to evenly distribute the essential oils.
Step 7: Pour into Containers
Immediately pour the mixture into clean tins or jars before it starts to cool and solidify. This step is vital for ensuring even distribution and a professional finish. Allow the salve to set at room temperature until it hardens fully.
Step 8: Label and Store
Once fully cooled and solidified, label your containers with the date and ingredients. Proper labeling helps you keep track of freshness and ensures you know what is in your salve. Store it in a cool, dry place to maintain its potency.

The Healing Properties of Dandelions
Dandelions are often overlooked, but their medicinal qualities are profound. Rich in vitamins A, C, and K, they are known for their anti-inflammatory and antimicrobial properties. Utilizing the whole plant—from roots to flowers—ensures you reap the benefits of this versatile herb. Incorporating dandelions into your skincare can not only soothe the skin but promote overall health.
Customizing Your Salve
One of the joys of making your own dandelion salve is the ability to customize it. Experiment with different essential oils or even other herbs to create a unique blend that suits your needs. For instance, tea tree oil can enhance antibacterial properties, while chamomile can provide additional calming effects. Play with ratios and ingredients to find your perfect match.
Using and Enjoying Your Dandelion Salve
The applications for dandelion salve are numerous. Use it to soothe cuts, moisturize dry skin, or even as a natural remedy for minor rashes. Keep a small tin with you for on-the-go hydration. Its convenient size and natural ingredients make it an excellent alternative to commercial products that often contain harsh chemicals.
FAQs
What if the salve turns out too thick?
If your salve is too thick, you can remelt it by placing it in a double boiler and adding a little more olive oil. This will help achieve the right consistency.
Can I use other types of oil in place of olive oil?
Yes, you can substitute olive oil with oils like coconut oil or sweet almond oil. Just remember that different oils may impart different properties to your salve.
Is it safe for all skin types?
Dandelion salve is generally safe for most skin types. However, if you have sensitive skin, perform a patch test before extensive use to ensure there are no adverse reactions.
How long does the salve take to set?
The salve usually sets within a few hours at room temperature, but for best results, allow it to cool overnight before use.
Can I add color to my salve?
While it's not common practice, you could add a small amount of natural colorants, such as alkanet root powder, if you desire a different hue. Just be aware this might alter the salve's properties.
What if I don’t have access to fresh dandelions?
If fresh dandelions are unavailable, you can use dried dandelion flowers instead. Simply reduce the infusion time for best results, generally about 2-3 days.
How should I clean the containers?
Before pouring the salve, ensure your containers are thoroughly cleaned and sterilized, preferably in hot, soapy water or by running them through a dishwasher cycle.
Conclusion
Dandelion salve not only serves as a beneficial addition to your skincare routine but also connects you with the healing power of nature. The process of making it can be both therapeutic and rewarding, bringing mindful consideration to the ingredients you apply to your skin.
So next time you see those cheerful yellow flowers, remember they hold a wealth of healing potential. Enjoy the process, and revel in the nourishing benefits of your homemade dandelion salve.
Recipe Card
Crafting Dandelion Salve for Everyday Use
Ingredients
Method
- Gather and Prepare Dandelion Flowers
- Infuse the Olive Oil with Dandelions
- Strain the Oil
- Melt Beeswax
- Combine Ingredients
- Add Essential Oils (Optional)
- Pour into Containers
- Label and Store
Notes
Additional serving suggestions: pair with a crisp salad, garlic bread, or roasted seasonal vegetables for balance.
For make-ahead, prep components separately and assemble just before heating to preserve texture.
Taste and adjust with acid (lemon/vinegar) and salt right at the end to wake up flavors.