Introduction
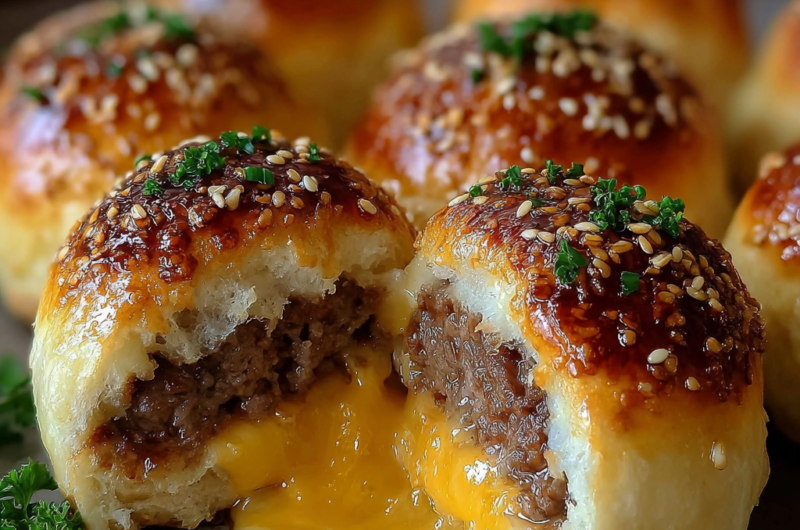
Garlic Parmesan Cheeseburger Bombs bring together the beloved flavors of a classic cheeseburger and the comforting appeal of garlic bread. These delightful bites are perfect for gatherings, game days, or a fun family dinner. The combination of juicy beef, melty cheese, and aromatic garlic creates an irresistible treat that everyone will love.
What sets these bombs apart is not only their taste but also their ease of preparation. Wrapped in store-bought biscuit dough, they come together quickly without compromising on flavor. They are crispy on the outside and filled with a savory mixture that makes each bite a delightful surprise.
Ingredients
- 1 lb ground beef
Ground beef serves as the hearty base of the bombs, providing rich flavor and essential protein. Choose a blend with about 20% fat for juiciness. - 1 cup shredded cheddar cheese
Cheddar cheese adds creaminess and a sharp flavor that enhances the overall cheeseburger experience. It melts wonderfully, creating an ooey-gooey center. - 1/2 cup grated Parmesan cheese
Parmesan cheese contributes a salty bite and depth of flavor, balancing the richness of the ground beef and cheddar. - 2 cloves garlic, minced
Fresh garlic infuses the mixture with a pungent aroma and zesty flavor, capturing the essence of garlic bread and elevating the dish. - 1/2 teaspoon onion powder
Onion powder adds a mild onion flavor, complementing the beef without overpowering it. This enhances the savory notes of the filling. - 1 teaspoon salt
Salt is essential for enhancing flavors and bringing out the natural taste of other ingredients. Adjust it based on your preference. - 1/2 teaspoon black pepper
Black pepper provides a hint of spice and complexity, rounding out the flavor profile of the cheese and beef. - 1 can (16 oz) refrigerated biscuit dough
Biscuit dough serves as the outer layer, crisping to a golden brown. It holds the flavors inside while adding a buttery, flaky texture. - 2 tablespoons melted butter
Melted butter is brushed on before baking, creating a golden, crispy crust and adding richness that enhances the overall flavor. - 1 tablespoon chopped fresh parsley (for garnish)
Chopped parsley adds a fresh herbaceous note and a pop of color, making these bombs visually appealing when served.
Directions & Preparation
Step 1: Preheat your oven to 400°F (200°C).
Preheating the oven ensures that the bombs cook evenly and develop the desired crispiness on the outside. A hot oven is key for achieving a golden-brown crust.
Step 2: In a large skillet, cook the ground beef over medium heat until browned, about 5-7 minutes, breaking it apart with a spatula.
Cooking the beef until it’s browned not only enhances flavor through the Maillard reaction but also helps to render some fat, which will make the filling rich and juicy.
Step 3: Add minced garlic, onion powder, salt, and black pepper to the cooked beef, and stir for an additional minute until fragrant.
This step builds layers of flavor. Adding the garlic towards the end prevents it from burning, ensuring a brighter garlic taste in the filling.
Step 4: Remove the skillet from heat and stir in the cheddar and Parmesan cheeses until melted and well combined.
This blending of cheeses creates a creamy, cohesive filling that binds the other ingredients together, making every bite savory and delish.
Step 5: Open the can of biscuit dough and separate the dough into rounds or squares, depending on the style you prefer.
Separating the dough prepares it for wrapping around the filling. Make sure to handle it gently to avoid tearing, ensuring it can encase the filling completely.
Step 6: Place a spoonful of the beef and cheese mixture in the center of each dough piece.
Filling the dough with the right amount of mixture is crucial. Too much can cause spills, while too little makes for a less flavorful experience.
Step 7: Cup the dough around the filling and pinch to seal the edges, forming a ball. Ensure it’s tightly sealed to prevent leakage during baking.
Sealing the bombs properly is essential for keeping all that cheesy goodness inside. If not sealed well, they may burst in the oven.
Step 8: Arrange the sealed bombs on a baking sheet lined with parchment paper.
Using parchment paper helps to prevent sticking and makes clean-up easier. The arrangement should allow for even cooking without overcrowding.
Step 9: Brush the tops with melted butter and sprinkle with additional Parmesan cheese.
Brushing with butter creates a beautifully golden exterior while the added Parmesan gives a burst of flavor and an appealing texture after baking.
Step 10: Bake in the preheated oven for 15-20 minutes until golden brown and bubbling.
Baking time may vary, so keep an eye out for a golden color. The bubbling indicates that the filling is heated through, ready to be enjoyed.
Step 11: Remove from the oven and let cool for a few minutes before serving. Garnish with chopped parsley.
Allowing the bombs to cool slightly makes them easier to handle and ensures the filling doesn’t ooze out when served. The parsley adds color and freshness, enhancing visual appeal.

The Secret to Perfectly Seasoned Meat
The seasoning in your meat mixture is pivotal. Using fresh garlic and a blend of spices not only enhances the flavor but also elevates the overall enjoyment of each bomb. Don’t rush this step; letting the seasoning meld into the beef while cooking creates a profound taste. Adjust salt and pepper according to your personal preference, especially if enjoying with kids.
Choosing the Right Cheese for Maximum Flavor
When it comes to cheeseburger bombs, cheese selection can make a dramatic difference. A combination of sharp cheddar and nutty Parmesan not only provides a balanced flavor but also achieves that gooey, stretchy texture that keeps you coming back for more. Experimenting with different cheese blends, such as Monterey Jack or pepper jack, can also add exciting layers of flavor.
Creating a Crisp Outer Layer
The technique of using biscuit dough lends itself to a wonderfully flaky and crispy outer layer, perfectly contrasting the soft and savory filling inside. Brushing your bombs with melted butter right before baking is a simple yet effective way to ensure golden-brown crispiness. Don’t skip this step if you desire that ideal texture!
FAQs
What if the filling leaks out while baking?
If your bombs leak, make sure to pinch the dough tightly before baking. Additionally, avoid overfilling; a spoonful of filling is usually sufficient.
Can I use homemade dough instead of biscuit dough?
Absolutely! If you prefer homemade dough, a simple pizza or bread dough can work well for a heartier flavor and texture.
Why are my bomb doughs not rising?
If the dough isn’t rising, it may be past its expiration date or your oven may not be at the correct temperature. Ensure the oven is preheated properly.
How do I adjust for spice preferences?
You can tweak the flavor profile by adding ingredients like diced jalapeños or using spicier cheese. Adjust seasonings accordingly based on your heat tolerance.
Can I make smaller versions of these bombs?
Definitely! You can divide the dough into smaller pieces, but be sure to adjust your baking time so they don’t overcook.
What if I find the filling bland?
If the filling tastes bland, consider adding a bit of Worcestershire sauce or hot sauce to the meat mixture before cooking for an enhanced flavor kick.
Conclusion
Garlic Parmesan Cheeseburger Bombs are not only delicious but also an incredibly fun way to enjoy familiar flavors in a new, exciting format. They can easily be customized to suit your taste preferences, making them a versatile addition to your recipe repertoire.
So gather your ingredients, roll up your sleeves, and get ready to impress your family and friends with these savory bites. They are sure to be a hit, bringing smiles and satisfied cravings around any table.
Recipe Card

Savory Garlic Parmesan Cheeseburger Bombs Recipe
Ingredients
Method
- Preheat your oven to 400°F (200°C).
- In a large skillet, cook the ground beef over medium heat until browned, about 5-7 minutes, breaking it apart with a spatula.
- Add minced garlic, onion powder, salt, and black pepper to the cooked beef, and stir for an additional minute until fragrant.
- Remove the skillet from heat and stir in the cheddar and Parmesan cheeses until melted and well combined.
- Open the can of biscuit dough and separate the dough into rounds or squares, depending on the style you prefer.
- Place a spoonful of the beef and cheese mixture in the center of each dough piece.
- Cup the dough around the filling and pinch to seal the edges, forming a ball. Ensure it’s tightly sealed to prevent leakage during baking.
- Arrange the sealed bombs on a baking sheet lined with parchment paper.
- Brush the tops with melted butter and sprinkle with additional Parmesan cheese.
- Bake in the preheated oven for 15-20 minutes until golden brown and bubbling.
- Remove from the oven and let cool for a few minutes before serving. Garnish with chopped parsley.
Notes
Additional serving suggestions: pair with a crisp salad, garlic bread, or roasted seasonal vegetables for balance.
For make-ahead, prep components separately and assemble just before heating to preserve texture.
Taste and adjust with acid (lemon/vinegar) and salt right at the end to wake up flavors.