Introduction
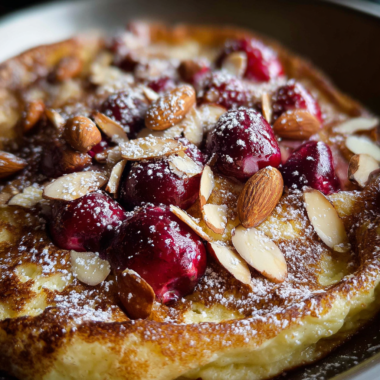
As summer transitions into fall, cherries shine in baked desserts, highlighting their juicy sweetness and vibrant color. Cherry crisp, a classic dessert, combines tart cherries with a crispy topping, creating a delightful balance of flavors and textures. This comforting dish is perfect for cozy family gatherings or as a sweet ending to a weeknight dinner.
The beauty of cherry crisp lies in its simplicity and versatility. Not only does it celebrate the fresh fruit of the season, but it also provides an excellent canvas for your culinary creativity. With just a few ingredients, you can whip up this delectable dessert that impresses both guests and family alike.
Ingredients
- 4 cups fresh or frozen cherries
Cherries are the star of this dish, imparting a sweet-tart flavor that forms the base of the crisp. Fresh cherries yield a juicier filling, while frozen cherries can provide convenience and year-round enjoyment. - 1 cup granulated sugar
Sugar enhances the natural sweetness of the cherries, balancing their tartness. It also helps to form a syrupy mixture that binds the filling together while baking. - 2 tablespoons cornstarch
Cornstarch is a thickening agent, essential for creating the right texture once the cherries are baked. It absorbs excess moisture, ensuring the filling maintains a lovely consistency. - 1 teaspoon vanilla extract
Vanilla adds depth to the flavor profile, enhancing the cherries' natural aromas. It's a subtle touch that brings out the best in this delightful dessert. - 1 cup rolled oats
Oats are a key component of the topping, providing a hearty texture and chewiness that contrasts beautifully with the tender fruit underneath. - 1 cup all-purpose flour
Flour lends structure to the crisp topping, creating a slightly crumbly texture as it bakes. It works in conjunction with oats for a satisfying crunch. - 1/2 cup brown sugar
Brown sugar adds a rich, caramel-like sweetness to the topping. Its moisture content helps create a more cohesive texture and enhances the overall flavor. - 1/2 teaspoon cinnamon
Cinnamon introduces a warm spice that pairs wonderfully with cherries, elevating the flavor complexity and adding a hint of warmth. - 1/2 cup unsalted butter, melted
Butter is vital for achieving that luscious, crunchy topping. It binds the dry ingredients together while adding richness and flavor. - 1/4 teaspoon salt
A pinch of salt balances the sweetness and enhances the overall flavor profile of the dessert, rounding it out beautifully.
Directions & Preparation
Step 1: Preheat the oven to 350°F (175°C).
This initial step is crucial, as preheating the oven ensures that your cherry crisp bakes evenly. A properly heated oven allows the topping to become golden and crisp while the filling bubbles gently.
Step 2: Prepare the cherry filling by combining cherries, granulated sugar, cornstarch, and vanilla extract in a bowl.
Mixing the cherries with sugar, cornstarch, and vanilla creates a vibrant, flavorful filling. The sugar will draw out moisture from the cherries, while the cornstarch thickens it as it bakes, resulting in a cohesive and flavorful mixture.
Step 3: Pour the cherry mixture into a greased 9×13-inch baking dish.
Ensuring the baking dish is greased will prevent the dessert from sticking, making it easier to serve later. Spreading the cherry mixture evenly allows for uniform cooking and ensures every spoonful is delicious.
Step 4: In a separate bowl, combine rolled oats, flour, brown sugar, cinnamon, melted butter, and salt to create the topping.
This step is essential for achieving that signature crisp topping. The combination of oats, flour, and sugar creates a crumbly mixture, while butter binds them together, resulting in a satisfying crunch atop the cherry filling.
Step 5: Spread the topping evenly over the cherry filling in the baking dish.
Evenly spreading the topping ensures consistent cooking and crunchiness. Make sure to cover the filling entirely; this prevents any exposed fruit from burning while helping to trap moisture within.
Step 6: Bake in the preheated oven for 40-45 minutes, or until the topping is golden brown and the cherries are bubbling.
Baking the crisp allows the flavors to meld and the topping to achieve that sought-after golden color. Keep an eye on the dish towards the end of the cooking time to ensure the topping doesn't over-brown.
Step 7: Let the cherry crisp cool for about 10-15 minutes before serving.
Allowing the crisp to cool slightly helps the filling set, making it easier to serve. This short wait period enhances the overall texture, so you don't end up with a soupy mess on your plate.
Step 8: Serve with a scoop of vanilla ice cream or whipped cream if desired.
Topping cherry crisp with ice cream or whipped cream not only adds a delightful creaminess but also balances the tartness of the cherries with its sweet, smooth texture. It transforms a great dessert into something truly indulgent.

Choosing the Right Cherries
When making cherry crisp, the type of cherries you select can significantly influence the flavor. Tart cherries, such as Montmorency, are often favored for their sharpness, which balances perfectly with the sweetness of the topping. Sweet cherries, on the other hand, create a more subdued flavor profile, ideal if you prefer a milder dessert. Whichever you choose, ensure they are ripe and juicy for the best results.
Swapping Ingredients for Variety
Feel free to experiment with the ingredients in your cherry crisp. For instance, substituting half of the cherries with other fruits, like blueberries or peaches, adds complexity and exciting new flavors. You can also use whole wheat flour in the topping for added nutrition and a nuttier taste, or try adding nuts or seeds for an extra crunch.
The Role of Toppings in Flavor
The topping in cherry crisp does more than just provide texture; it elevates the entire dish with its rich flavor. The combination of brown sugar and cinnamon brings a warm, cozy element. Feel free to play with spices like nutmeg or ginger to adapt the flavor to your preference. Additionally, incorporating chopped nuts can provide an appealing crunch and nutritional benefits.
FAQs
What if my cherry filling is too watery?
If the filling turns out too watery, you can mix in a bit more cornstarch and gently cook it on the stovetop for a few minutes to thicken it before placing it in the baking dish.
How can I adjust the recipe if I have fewer cherries?
If you have less than the required amount of cherries, reduce the sugar and cornstarch proportionally to maintain the right balance of sweetness and thickness in the filling.
Can I use jarred cherries for this recipe?
Yes, jarred cherries can be a great alternative. Just make sure to drain them well to minimize excess liquid and adjust sugar to taste, as they may already be sweetened.
What if my topping doesn't get crispy enough?
If the topping isn’t as crispy as you'd like, try baking it for additional time, or broil it for a few minutes at the end, keeping a close eye to prevent burning.
Can I make a smaller batch of cherry crisp?
Absolutely! You can halve the ingredients and use a smaller baking dish. Just keep an eye on the cooking time, as it may reduce slightly.
How do I prevent the topping from becoming too dry?
To prevent a dry topping, ensure you use enough butter and avoid overbaking. The mixture should be moist before baking but crumbly.
Conclusion
Cherry crisp is a timeless dessert that not only pleases the palate but also celebrates seasonal fruits. With its appealing texture and tangy-sweet flavors, it’s bound to become a favorite among your family and friends. Plus, the endless possibilities for customization mean you can make it uniquely yours.
Whether served warm with a scoop of ice cream or enjoyed on its own, cherry crisp embodies the essence of comfort food. So gather your ingredients and get ready to embrace the joy of baking this delightful dessert.
Recipe Card

Delightful Cherry Crisp for Every Home Cook
Ingredients
Method
- Preheat the oven to 350°F (175°C).
- Prepare the cherry filling by combining cherries, granulated sugar, cornstarch, and vanilla extract in a bowl.
- Pour the cherry mixture into a greased 9x13-inch baking dish.
- In a separate bowl, combine rolled oats, flour, brown sugar, cinnamon, melted butter, and salt to create the topping.
- Spread the topping evenly over the cherry filling in the baking dish.
- Bake in the preheated oven for 40-45 minutes, or until the topping is golden brown and the cherries are bubbling.
- Let the cherry crisp cool for about 10-15 minutes before serving.
- Serve with a scoop of vanilla ice cream or whipped cream if desired.
Notes
Additional serving suggestions: pair with a crisp salad, garlic bread, or roasted seasonal vegetables for balance.
For make-ahead, prep components separately and assemble just before heating to preserve texture.
Taste and adjust with acid (lemon/vinegar) and salt right at the end to wake up flavors.