Introduction
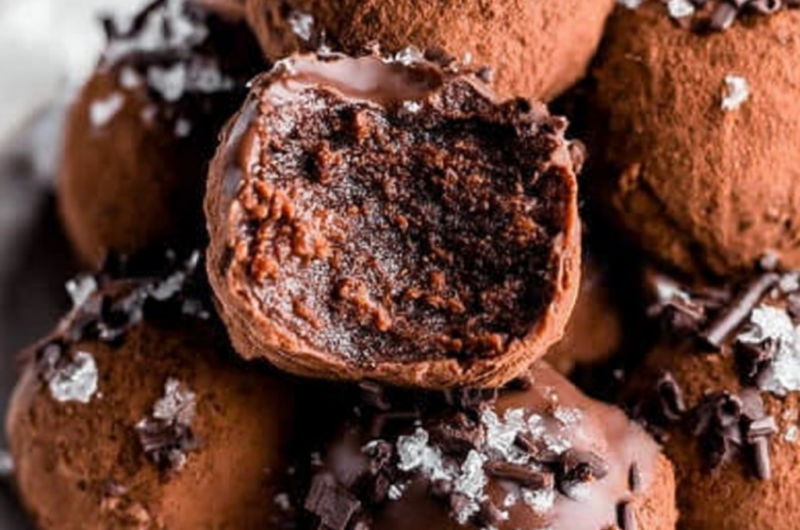
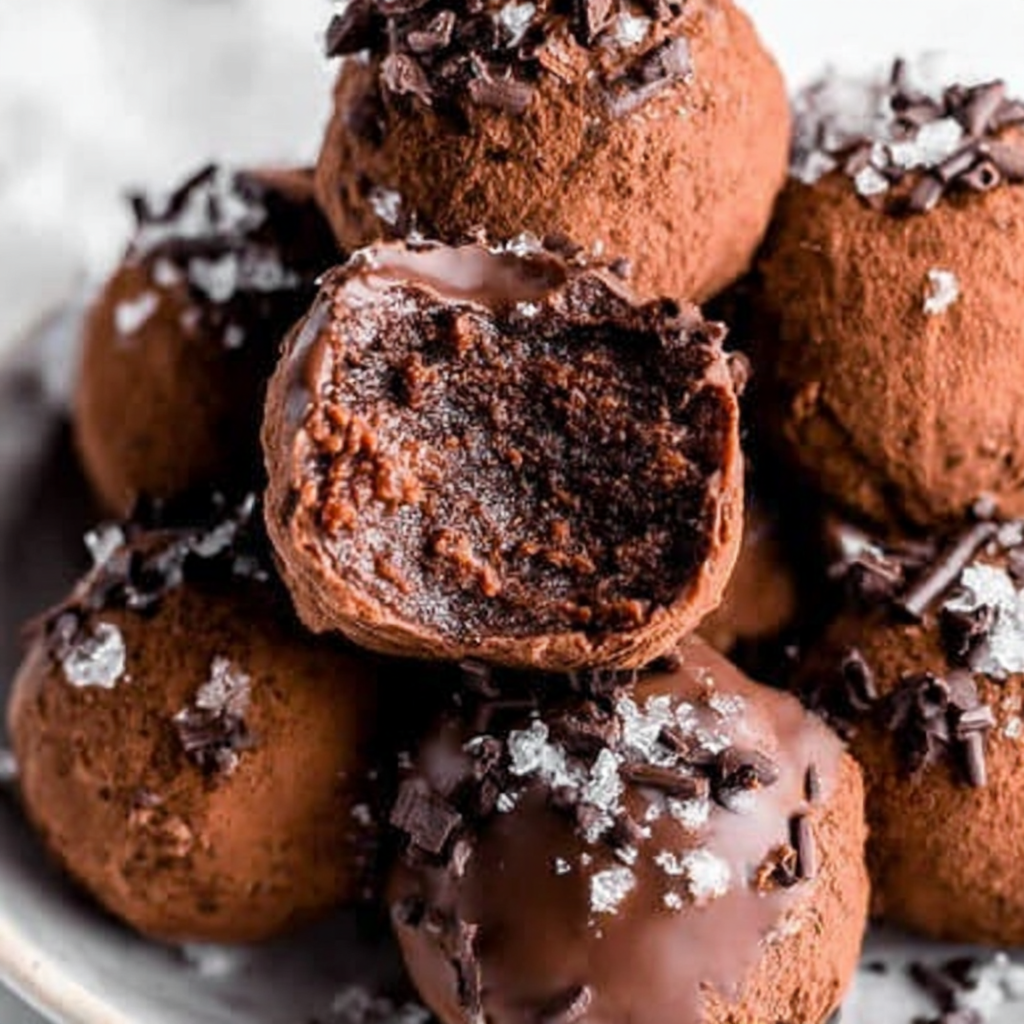
Chocolate brownie truffles are the perfect indulgence for any chocolate lover. These decadent little bites combine the rich, fudgy texture of brownies with the smooth, luxurious feel of truffles. They are surprisingly easy to make and are sure to impress at any gathering, from birthday parties to cozy family dinners.
These truffles offer a delightful interplay of flavors and textures, creating a blissful experience with each bite. Plus, they can be customized with various toppings or flavors, allowing you to make them uniquely your own. Whether you prefer a classic chocolate flavor or something with a twist, these truffles are sure to satisfy your sweet cravings.
Making chocolate brownie truffles is not only a rewarding culinary activity but also a wonderful way to share love and sweetness with others. Let’s dive into the ingredients and preparation that will lead you to these delightful truffles.
Ingredients
- 1 cup all-purpose flour
All-purpose flour provides structure to the brownies, helping them hold their shape during and after baking. It also contributes to the overall chewiness that makes brownies so irresistible. - 1 cup granulated sugar
Granulated sugar is essential for sweetness and moisture in the brownies. It helps create the perfect balance of flavors and contributes to a glossy finish once baked. - 1/2 cup unsweetened cocoa powder
Cocoa powder is the star ingredient that infuses the brownies with a deep chocolate flavor. It also adds to the texture, leading to a rich and fudgy consistency. - 1/2 cup unsalted butter, melted
Melted butter adds moisture and richness to the brownies. It helps bind the ingredients together while contributing to a luscious mouthfeel. - 2 large eggs
Eggs provide moisture and help in binding all the ingredients together. They also create a cakey texture that contrasts beautifully with the dense chocolate. - 1 teaspoon vanilla extract
Vanilla extract enhances the chocolate flavor and adds a subtle warmth to the brownies, making them taste more complex and inviting. - 1/2 cup chocolate chips
Chocolate chips add extra bursts of chocolatey goodness in each bite. They melt during baking, creating delightful gooey pockets throughout the brownies. - 1 cup heavy cream
Heavy cream is used to create the rich ganache that coats the truffles. Its high-fat content gives the truffles a velvety texture and enhances their decadence. - Toppings (e.g., cocoa powder, nuts, sprinkles)
Toppings allow you to customize your truffles for flavor and presentation. They add visual appeal and can introduce new textures that complement the smooth ganache.
Directions & Preparation
Step 1: Preheat your oven to 350°F (175°C).
Preheating the oven is crucial for even baking. When you place your brownie batter into a hot oven, it helps set the edges while keeping the center fudgy. This initial temperature creates the perfect environment for your brownies to bake correctly.
Step 2: In a large mixing bowl, combine melted butter and sugar, stirring until well blended.
Mixing the melted butter with sugar helps dissolve the sugar, ensuring even distribution. This step also aerates the mixture, which is key for creating a light texture in your brownies.
Step 3: Add in the eggs, one at a time, mixing well after each addition. Then stir in the vanilla extract.
Adding the eggs one by one allows them to fully incorporate into the butter-sugar mixture. This gradual process results in a smooth batter, which is essential for achieving the perfect brownie consistency.
Step 4: Sift in the flour and cocoa powder, and stir until just combined.
Sifting the dry ingredients helps remove any lumps and ensures even distribution of cocoa throughout the batter. It's important to mix until just combined to avoid overworking the gluten, which could result in a denser brownie.
Step 5: Fold in the chocolate chips, ensuring they are evenly distributed throughout the batter.
Folding in the chocolate chips at the end creates delicious pockets of melted chocolate in your brownies. This step also keeps the batter from becoming overmixed.
Step 6: Pour the batter into a greased and lined 8×8 inch baking pan, spreading it evenly.
Ensuring the batter is evenly distributed in the pan allows for uniform baking. Lining the pan prevents the brownies from sticking, making them easier to remove later.
Step 7: Bake for 20-25 minutes, until a toothpick comes out with a few moist crumbs.
Baking time is crucial; overbaking can lead to dry brownies. A toothpick test ensures that your brownies are perfectly baked, maintaining their fudginess without being gooey.
Step 8: Once baked, allow the brownies to cool in the pan for about 10 minutes before transferring to a wire rack to cool completely.
Cooling the brownies in the pan helps them set while also making it easier to cut them later. Transferring to a wire rack ensures that they cool evenly on all sides.
Step 9: Once cooled, cut the brownies into small squares and set aside.
Cutting the brownies into bite-sized pieces makes it easier to form truffles later. Smaller pieces will also integrate better with the ganache and toppings when you create the truffles.
Step 10: In a small saucepan, heat the heavy cream over medium heat until gently simmering, then pour it over the chopped chocolate.
Heating the cream before adding it to the chocolate ensures that the chocolate melts properly. This technique is crucial for making a smooth ganache that coats the brownie pieces.
Step 11: Let the mixture sit for a minute before stirring until smooth and glossy, making sure all chocolate is melted.
Allowing the hot cream to sit lets the chocolate gain heat evenly, making it easier to combine into a silky ganache. Stirring thoroughly is essential for achieving a uniform texture.
Step 12: Add the brownie pieces to the ganache and mix until evenly coated.
Combining the brownies with the ganache is what binds them together, transforming them into truffle material. Make sure each piece is well-coated for a cohesive final product.
Step 13: Refrigerate the mixture for about 1 hour, or until firm enough to scoop and roll into balls.
Chilling the mixture firms it up, making it easier to scoop and shape the truffles. Be patient during this step, as the right consistency is key to achieving the ideal truffle texture.
Step 14: Using a small scoop or spoon, portion out the mixture and roll into balls.
Rolling the truffles by hand gives them that signature round shape. Aim for uniform sizes to ensure consistent texture and baking time across all the truffles.
Step 15: Roll the truffles in your choice of toppings to finish before serving.
Using toppings not only adds a visual element but also enhances texture and flavor. Whether you choose cocoa powder, crushed nuts, or sprinkles, this final step allows for personalization.

Enhanced Flavor with a Pinch of Salt
Adding a pinch of salt to the mixture, particularly when incorporating the butter and sugar, can elevate the chocolate flavor remarkably. Salt acts as a flavor enhancer, cutting through the sweetness and bringing out the deep, rich notes of the cocoa. This subtle enhancement can transform your brownies from ordinary to extraordinary, making every bite more satisfying.
Exploring Different Coatings
While cocoa powder or sprinkles are classic coatings, don't hesitate to think outside the box. Consider rolling your truffles in finely crushed nuts, toasted coconut, or even crumbled cookies for an exciting texture contrast. The coating you choose can drastically alter the overall eating experience, providing crunch or additional flavor nuances that pair beautifully with the rich chocolate.
Customizing Your Brownie Truffles
These brownie truffles are versatile; you can easily tailor them to your flavor preferences. Try mixing in a teaspoon of espresso powder to enhance the chocolate flavor, or fold in some mint extract for a refreshing twist. The base recipe is adaptable, allowing for a variety of creative additions to reflect your taste or theme for special occasions.
FAQs
What should I do if my brownie batter is too thick?
If your brownie batter is too thick, you can add a tablespoon of milk or water to thin it out slightly, ensuring it remains pourable.
Can I use dark chocolate instead of cocoa powder?
Yes, you can substitute semi-sweet or dark chocolate for the cocoa powder; however, adjust the sugar since dark chocolate is often less sweet.
Why are my brownies too fudgy and not holding shape?
If your brownies are overly fudgy, it could be due to underbaking or too much fat. Ensure your oven is at the correct temperature and consider reducing the butter slightly next time.
What can I add to make my truffles more flavorful?
To enhance flavor, consider adding spices like cinnamon or nutmeg, or extracts like almond or peppermint, to the melted ganache.
Can these truffles be made smaller for bite-sized treats?
Absolutely! You can adjust the size of the truffles. Just keep in mind that smaller truffles will require less refrigeration time.
How do I know when to stop mixing the brownie batter?
Stop mixing when no flour streaks remain visible. Overmixing can lead to a tougher brownie, so it's better to err on the side of caution.
What should I do if my ganache is too runny?
If your ganache is too runny, refrigerate it for a bit longer to thicken or, alternatively, add more chocolate until a thicker texture is reached.
How can I ensure even coating on my truffles?
To ensure an even coating, use a fork or skewer to dip each truffle into the ganache, allowing excess to drip off before rolling in the toppings.
Conclusion
Chocolate brownie truffles are a delightful and sophisticated treat, perfect for any occasion. The combination of rich brownie flavors with the smoothness of ganache creates an irresistible dessert that everyone will love.
With the ability to personalize the flavors and toppings, these truffles allow you to showcase your creativity in the kitchen. So whip up a batch, share them with your loved ones, and enjoy the sweet rewards of your efforts.
Recipe Card
Decadent Chocolate Brownie Truffles at Home
Ingredients
Method
- Preheat your oven to 350°F (175°C).
- In a large mixing bowl, combine melted butter and sugar, stirring until well blended.
- Add in the eggs, one at a time, mixing well after each addition. Then stir in the vanilla extract.
- Sift in the flour and cocoa powder, and stir until just combined.
- Fold in the chocolate chips, ensuring they are evenly distributed throughout the batter.
- Pour the batter into a greased and lined 8x8 inch baking pan, spreading it evenly.
- Bake for 20-25 minutes, until a toothpick comes out with a few moist crumbs.
- Once baked, allow the brownies to cool in the pan for about 10 minutes before transferring to a wire rack to cool completely.
- Once cooled, cut the brownies into small squares and set aside.
- In a small saucepan, heat the heavy cream over medium heat until gently simmering, then pour it over the chopped chocolate.
- Let the mixture sit for a minute before stirring until smooth and glossy, making sure all chocolate is melted.
- Add the brownie pieces to the ganache and mix until evenly coated.
- Refrigerate the mixture for about 1 hour, or until firm enough to scoop and roll into balls.
- Using a small scoop or spoon, portion out the mixture and roll into balls.
- Roll the truffles in your choice of toppings to finish before serving.
Notes
Additional serving suggestions: pair with a crisp salad, garlic bread, or roasted seasonal vegetables for balance.
For make-ahead, prep components separately and assemble just before heating to preserve texture.
Taste and adjust with acid (lemon/vinegar) and salt right at the end to wake up flavors.