Introduction
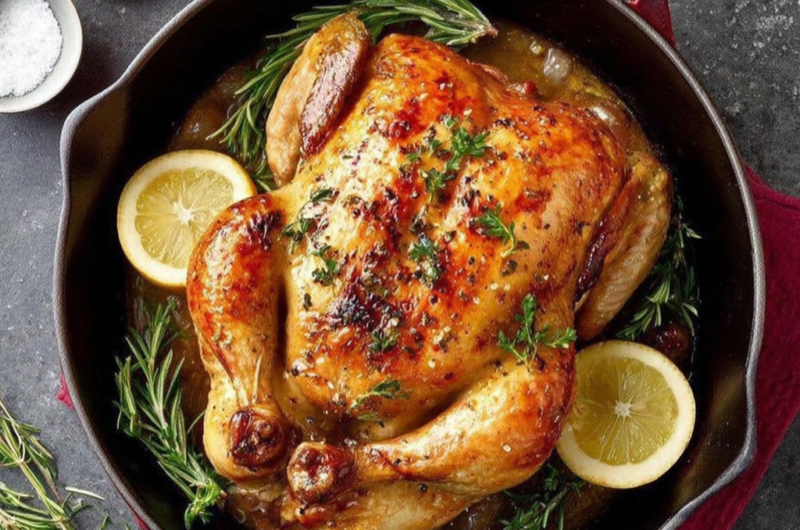
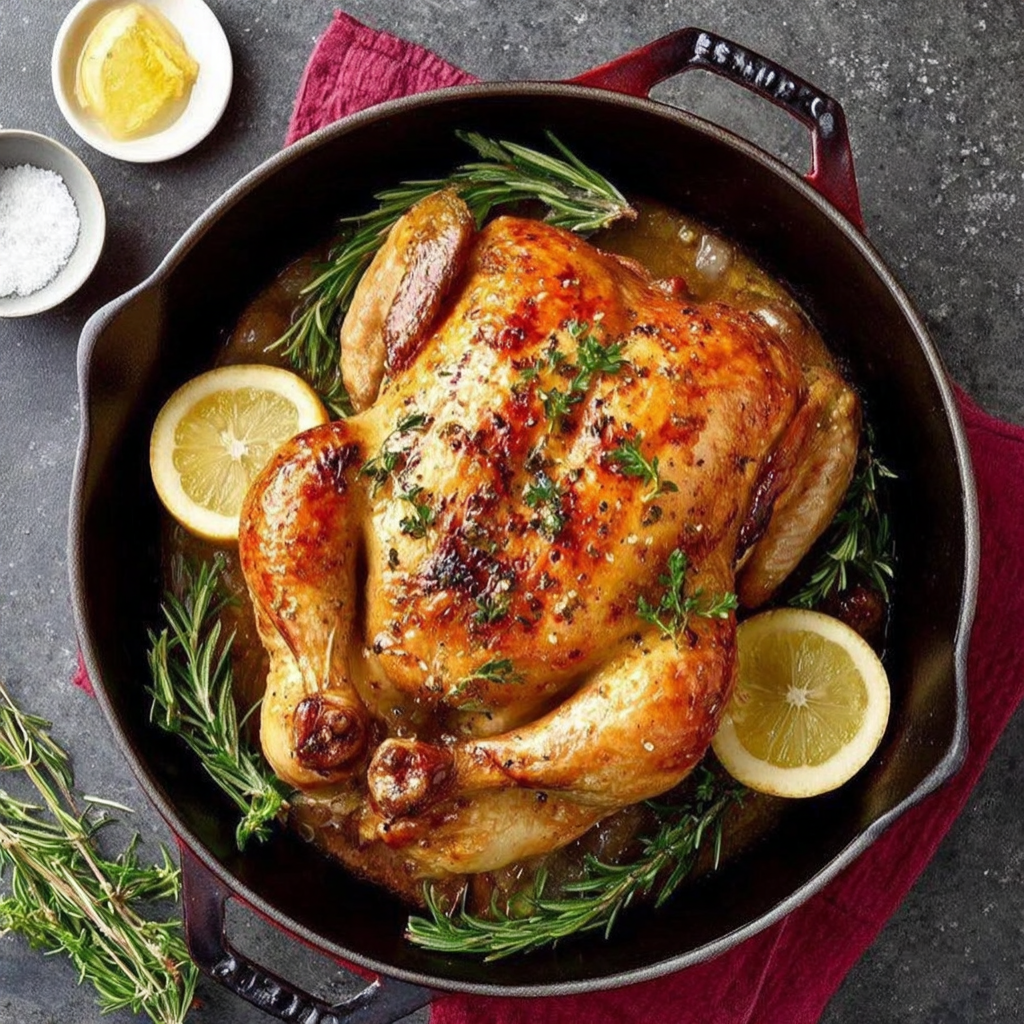
Cooking a whole chicken in a Dutch oven transforms a simple meal into a flavorful feast. This method provides even heat distribution, allowing the chicken to roast beautifully. The results are incredibly tender meat paired with a delightfully crispy skin. You'll find that the whole cooking process is not only straightforward but also yields an impressive dish that your family and friends will love.
Roasting in a Dutch oven retains moisture and adds depth to the chicken, making it a go-to option for home cooks. With the right ingredients and a little patience, you can achieve restaurant-quality results in your own kitchen. Great for Sunday dinner or any special occasion, this Dutch oven whole chicken recipe is versatile enough to adapt to your taste.
Ingredients
- 1 whole chicken (about 4-5 lbs)
Choosing a high-quality, fresh chicken is essential as it affects texture and flavor. A properly-sized chicken ensures even cooking and better moisture retention. - 2 tablespoons olive oil
Olive oil helps to crisp the skin while roasting. It also adds flavor and allows seasonings to adhere well to the chicken. - 1 tablespoon kosher salt
Kosher salt is ideal for seasoning meat. It enhances the natural flavors of the chicken, while also helping to pull moisture from the meat, resulting in a juicy roast. - 1 teaspoon black pepper
Black pepper adds a subtle heat and complexity to the flavor profile, balancing the richness of the chicken. - 1 lemon, halved
The acidity from lemon brightens the overall flavor of the chicken as it roasts, providing a refreshing contrast to the savory notes. - 4 garlic cloves, smashed
Garlic infuses the chicken with a rich aroma and flavor. It caramelizes during cooking, contributing a sweet note to the dish. - 1 large onion, quartered
Onions provide a natural sweetness and robust flavor. When roasted, they soften and complement the chicken beautifully. - Fresh herbs (like rosemary or thyme)
Fresh herbs elevate the dish's aroma and flavor. They infuse the meat with their essence, making every bite more enjoyable. - 1 cup chicken broth
Adding broth helps create steam and maintains moisture during cooking, resulting in tender meat. It also contributes depth to the overall flavor.
Directions & Preparation
Step 1: Preheat your oven to 425°F (220°C).
Starting with a preheated oven ensures that the chicken cooks evenly and develops a crispy skin. A hot oven sets the stage for roasting, locking in juices right from the start.
Step 2: Pat the chicken dry with paper towels.
Drying the skin helps to achieve that coveted crispy texture. Excess moisture can steam the chicken instead of roasting it, leaving you with a less desirable finish.
Step 3: Rub the entire chicken with olive oil, salt, and pepper.
Coating the chicken with olive oil not only contributes to browning but also ensures the seasoning adheres properly. This layer builds flavor and texture that enhances the outcome.
Step 4: Stuff the chicken cavity with lemon halves, garlic, and herbs.
Stuffing the cavity infuses the meat with flavor as it cooks. The aromatics release their oils, allowing each bite to be flavorful and fragrant.
Step 5: Place the quartered onion at the bottom of the Dutch oven.
The onions act as a flavorful base, preventing the chicken from sitting directly on the pot. They will caramelize and add depth to the chicken and any pan juices.
Step 6: Set the chicken breast-side up on top of the onions.
Positioning the chicken correctly ensures even cooking and allows the breast to collect juices. This placement enhances the overall tenderness and flavor as the chicken roasts.
Step 7: Pour chicken broth around the chicken in the pot.
Adding broth creates a steamy environment, which helps to keep the chicken moist throughout the cooking process. It also aids in forming a delicious sauce from the drippings.
Step 8: Cover the Dutch oven and roast for 1 hour.
Covering during the initial roasting traps heat and moisture, cooking the chicken evenly. This method prevents the meat from drying out before the skin crisps.
Step 9: Remove the lid and continue roasting for an additional 30-40 minutes.
Uncovering allows the skin to brown and crisp, creating a delicious contrast in texture. The chicken is done when the juices run clear and the skin is golden.
Step 10: Let the chicken rest for 15 minutes before carving.
Resting allows the juices to redistribute throughout the meat, ensuring each slice is juicy and tender. This brief pause enhances the overall eating experience.

Elevating Flavors with Citrus
Using citrus, especially lemons, adds an invigorating brightness to the dish. As the chicken cooks, the citric acidity permeates the meat, creating a flavorful contrast to the savory elements. The resulting juice from the lemon can be drizzled over the carved chicken to enhance the vibrant taste.
The Role of Aromatics in Roasting
Aromatics such as garlic and onion are game-changers for the flavor profile of your whole chicken. They not only complement the chicken's natural flavors but also create a fragrant base that envelopes the meat as it roasts. The caramelized aromatics are a delightful addition to any side dishes.
Why a Dutch Oven is Key
A Dutch oven’s heavy construction allows for excellent heat retention, ensuring an even cook and a perfect roast each time. This tool is versatile; it can go from stovetop to oven, making it ideal for a roast like this. The lid helps trap moisture, resulting in a flavorful and succulent chicken that’s hard to match.
FAQs
Can I add vegetables to the pot?
Absolutely! Adding root vegetables like carrots or potatoes around the chicken will not only enhance flavor but also create a complete meal in one pot. Just ensure they are cut into even sizes for uniform cooking.
What if my chicken turns out bland?
If your chicken lacks flavor, ensure you are generous with seasonings. Salt is crucial, so don't skip it. Additionally, consider marinating the chicken beforehand or adding herbs both inside and out.
How do I prevent the chicken from overcooking?
To avoid overcooking, use a meat thermometer. The internal temperature should reach 165°F (75°C) at the thickest part of the breast. Remove it from the oven as soon as it hits this temperature.
Can I scale this recipe for a larger meal?
Certainly! If using a larger chicken, adjust the cooking time by adding approximately 15-20 minutes per additional pound. Just ensure your Dutch oven is large enough to accommodate the bird comfortably.
What are signs that the chicken is done?
Look for clear juices running from the chicken when pierced with a knife, and the skin should be golden brown. Additionally, a meat thermometer reading of 165°F (75°C) confirms doneness.
What should I do if the skin isn't crispy?
If your chicken's skin is not crispy, try cooking it uncovered for an extra few minutes under high heat to achieve that desired texture. Alternatively, broil it briefly while watching closely to avoid burning.
Conclusion
Roasting a whole chicken in a Dutch oven is not just a meal; it's an experience that brings family and friends together. The combination of tender meat, crisp skin, and rich flavors creates a satisfying dish everyone will appreciate. Plus, the ease of preparation makes it an excellent choice for any cook, from novice to expert.
With a little attention to detail and a few simple ingredients, you can create a dish that is both elegant and comforting. Enjoy the fruits of your labor, and impress your guests with this delightful Dutch oven whole chicken recipe.
Recipe Card
Perfectly Roasted Dutch Oven Whole Chicken
Ingredients
Method
- Preheat your oven to 425°F (220°C).
- Pat the chicken dry with paper towels.
- Rub the entire chicken with olive oil, salt, and pepper.
- Stuff the chicken cavity with lemon halves, garlic, and herbs.
- Place the quartered onion at the bottom of the Dutch oven.
- Set the chicken breast-side up on top of the onions.
- Pour chicken broth around the chicken in the pot.
- Cover the Dutch oven and roast for 1 hour.
- Remove the lid and continue roasting for an additional 30-40 minutes.
- Let the chicken rest for 15 minutes before carving.
Notes
Additional serving suggestions: pair with a crisp salad, garlic bread, or roasted seasonal vegetables for balance.
For make-ahead, prep components separately and assemble just before heating to preserve texture.
Taste and adjust with acid (lemon/vinegar) and salt right at the end to wake up flavors.