Introduction
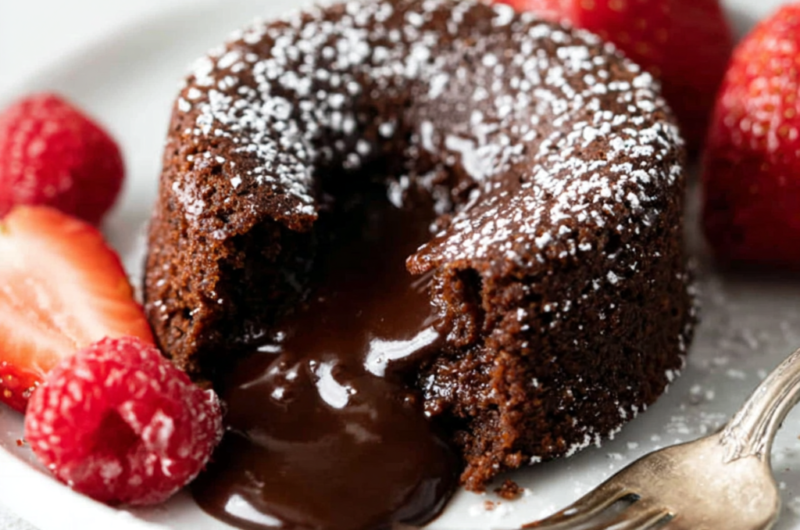
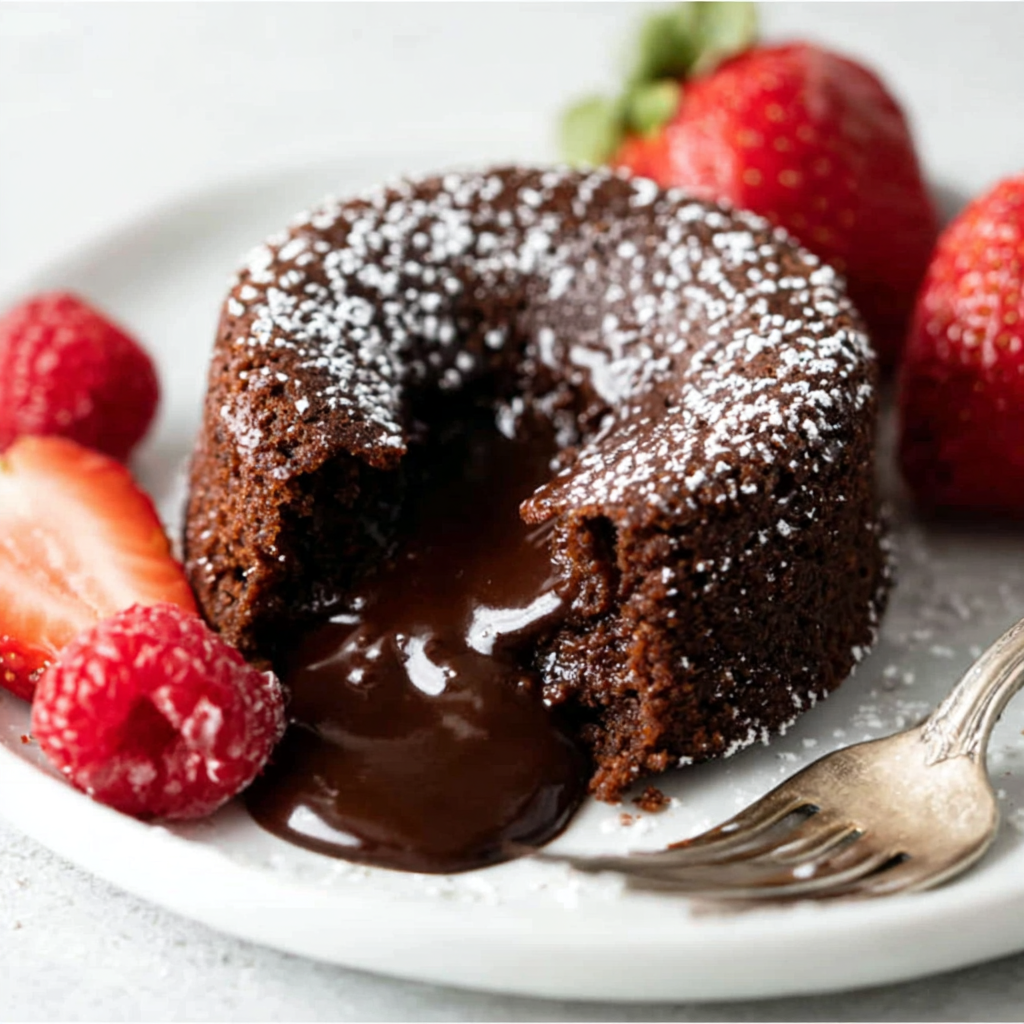
Chocolate molten lava cakes are the epitome of indulgence, combining rich chocolate flavor with a gooey, flowing center that captivates dessert lovers. The moment you break into one of these cakes, warm chocolate oozes out, creating a delightful experience for your taste buds. Perfect for special occasions or a comforting treat, these little cakes can make any evening feel extraordinary.
While the concept of molten lava cakes may seem complex, they are surprisingly simple to prepare at home. With just a handful of quality ingredients and a few key techniques, you can impress your family or guests with a dessert that appears far more sophisticated than it is. Let the sweet aroma of melting chocolate fill your kitchen as you embark on this delightful culinary adventure.
Ingredients
- 1 cup bittersweet chocolate
The chocolate is the star of the dish. Bittersweet chocolate provides a rich flavor, striking a balance between sweetness and depth, ensuring a satisfying dessert experience. - 1/2 cup unsalted butter
Butter adds richness, moisture, and contributes to the cake's tender texture. It also aids in creating the luscious melting center that is characteristic of lava cakes. - 2 large eggs
Eggs serve as a binding agent, giving structure to the cake while still allowing for the oozy center. They also contribute to the volume, helping the cakes rise and hold their shape. - 2 large egg yolks
Extra yolks enrich the mixture, adding creaminess and enhancing the overall flavor. They help create a moist cake that melts in your mouth. - 1/4 cup granulated sugar
Sugar not only sweetens the cake but also aids in the overall texture. It helps create a beautifully crisp exterior while keeping the inside soft. - 1/4 cup all-purpose flour
Flour provides the necessary structure without weighing the cake down. Just a small amount ensures that the cake is delicate yet holds together. - 1/2 teaspoon vanilla extract
Vanilla adds depth of flavor, complementing the chocolate and enhancing the overall sweetness. It introduces a warm, aromatic quality to the cakes. - Pinch of salt
Salt balances the sweetness and accentuates the chocolate flavor. It rounds out the taste, ensuring a well-seasoned dessert.
Directions & Preparation
Step 1: Preheat your oven to 425°F (220°C) and grease four ramekins thoroughly.
Preheating the oven ensures that the cakes bake evenly and rise properly. Greasing the ramekins with butter or non-stick spray helps prevent sticking, ensuring that the lava cakes release easily after baking.
Step 2: Melt the chocolate and butter together in a heatproof bowl over simmering water (double boiler method). Stir until smooth and well combined.
Using a double boiler gently melts the chocolate and butter without burning them, preserving their flavor and texture. Stirring continuously helps prevent overheating and allows for a silky smooth mixture free of lumps.
Step 3: In a mixing bowl, whisk together the eggs, egg yolks, and sugar until the mixture is pale and slightly thickened.
Whisking the eggs and sugar introduces air, creating a lighter batter. This step also ensures that the sugar dissolves properly, enhancing sweetness evenly throughout the batter.
Step 4: Add the melted chocolate mixture to the egg mixture, followed by the vanilla extract and pinch of salt. Mix until fully incorporated.
Combining the chocolate with the egg mixture ensures a uniform distribution of flavor and color. It's important to mix gently to maintain the airiness created in the previous step.
Step 5: Sift in the flour and fold gently into the batter until just combined, being careful not to overmix.
Folding in the flour gently helps to maintain the airy texture while forming the batter. Overmixing can lead to denser cakes, which is not ideal for the desired molten center.
Step 6: Divide the batter evenly among the prepared ramekins, filling each about 3/4 full.
Filling the ramekins to the correct level is crucial: too little batter can result in undercooked cakes, while too much can lead to overflowing. Ensure each ramekin is evenly filled for consistent baking.
Step 7: Bake in the preheated oven for 12–14 minutes, or until the edges are firm but the center remains soft.
Baking time is essential to achieve the perfect molten center. Watch closely as the cakes can go from undercooked to overcooked quickly; the edges should be set, while the center jiggles slightly.
Step 8: Remove from the oven and allow the cakes to rest for 1 minute before inverting onto plates.
Resting the cakes briefly helps them hold their shape when inverted. Inverting them while still warm allows the molten center to flow out, providing a delightful presentation.
Step 9: Serve immediately, optionally with a dusting of powdered sugar, a scoop of ice cream, or fresh berries.
Serving the cakes right away ensures you enjoy the gooey center at its best. Garnishes like powdered sugar or ice cream can elevate the dessert and add contrasting textures and flavors.

The Art of Melting Chocolate
Melting chocolate is a delicate process that requires attention to temperature to avoid scorching it. The double boiler method is highly recommended to achieve a smooth consistency, but an alternative approach is using the microwave in short bursts. Ensuring the chocolate is melted just right will contribute to the luxurious texture and flavor of your lava cakes, setting the tone for the entire dessert.
Perfecting the Molten Center
The molten center is what truly defines these cakes, making timing critical during baking. If baked too long, you'll lose the ooey-gooey texture that makes them special. The ideal consistency is achieved when the edges are firm but the center remains a rich, flowing chocolate. Remember to keep an eye on your cakes in the oven and conduct the jiggle test for perfect results.
Serving and Pairing Suggestions
When it comes to serving your molten lava cakes, presentation can enhance the experience. Pair them with a scoop of vanilla ice cream for a delightful contrast in temperature and flavor. Fresh berries, like raspberries or strawberries, add a tartness that balances the richness of the chocolate. A drizzle of caramel or a dusting of cocoa powder can add an extra flair, highlighting the decadent nature of this dessert.
FAQs
What can I do if the batter seems too thick?
If your batter feels too thick, consider adding a tablespoon of melted butter or a splash of heavy cream to loosen it up. This adjustment can help achieve the desired pouring consistency.
Why did my cakes come out bland?
Bland cakes may result from insufficient sugar or flavoring. Ensure you're measuring ingredients accurately and consider adding more vanilla or incorporating a pinch of espresso powder to enhance the chocolate flavor.
How do I know if my cakes are overcooked?
Overcooked lava cakes will not have a gooey center; instead, they will feel overly firm throughout. To avoid this, keep a close eye on the baking time and do the jiggle test to check for doneness.
Can I use different types of chocolate?
Yes! You can experiment with different types of chocolate such as dark or milk chocolate. Just remember that milk chocolate will make the cake sweeter, while dark chocolate will enhance the richness.
What if I want to scale the recipe for more servings?
You can easily double or triple the recipe. Just be sure to bake them in batches if your oven and ramekins can’t accommodate the entire amount at once to ensure consistent cooking.
How can I avoid sticking when inverting the cakes?
Thoroughly greasing your ramekins is key to preventing sticking. Additionally, allowing the cakes to rest slightly after baking will help them release more easily.
Conclusion
Creating chocolate molten lava cakes at home may feel like a daunting task, but with the right approach and attention to detail, you can master this impressive dessert. Each bite is a celebration of chocolate bliss, making it a perfect ending to any meal or a delightful treat just for you.
So, don your apron, gather your ingredients, and prepare to indulge in a warm, gooey escape that promises satisfaction with every mouthful. With practice and enjoyment, you'll find this recipe a go-to for satisfying those chocolate cravings.
Recipe Card
Decadent Chocolate Molten Lava Cakes Recipe
Ingredients
Method
- Preheat your oven to 425°F (220°C) and grease four ramekins thoroughly.
- Melt the chocolate and butter together in a heatproof bowl over simmering water (double boiler method). Stir until smooth and well combined.
- In a mixing bowl, whisk together the eggs, egg yolks, and sugar until the mixture is pale and slightly thickened.
- Add the melted chocolate mixture to the egg mixture, followed by the vanilla extract and pinch of salt. Mix until fully incorporated.
- Sift in the flour and fold gently into the batter until just combined, being careful not to overmix.
- Divide the batter evenly among the prepared ramekins, filling each about 3/4 full.
- Bake in the preheated oven for 12–14 minutes, or until the edges are firm but the center remains soft.
- Remove from the oven and allow the cakes to rest for 1 minute before inverting onto plates.
- Serve immediately, optionally with a dusting of powdered sugar, a scoop of ice cream, or fresh berries.
Notes
Additional serving suggestions: pair with a crisp salad, garlic bread, or roasted seasonal vegetables for balance.
For make-ahead, prep components separately and assemble just before heating to preserve texture.
Taste and adjust with acid (lemon/vinegar) and salt right at the end to wake up flavors.